
Installing Okta
Installing Okta
Setting up the Okta/Trustle Integration
Welcome to the section on installing Okta with Trustle. This section will showcase how to setup your environment and connect with Trustle. Let's get started!
Adding the Integration
- Login to Trustle as the Org Owner (person who created the Trustle account.)
- Click Manage -> Add System -> Okta
- For name, we'll call it okta-hr (but you can call it anything you'd like) and click Save
- On another tab, login to Okta as Admin
- Select Applications -> Create App Integration -> OIDC - OpenID Connect -> Web Application, then click Next

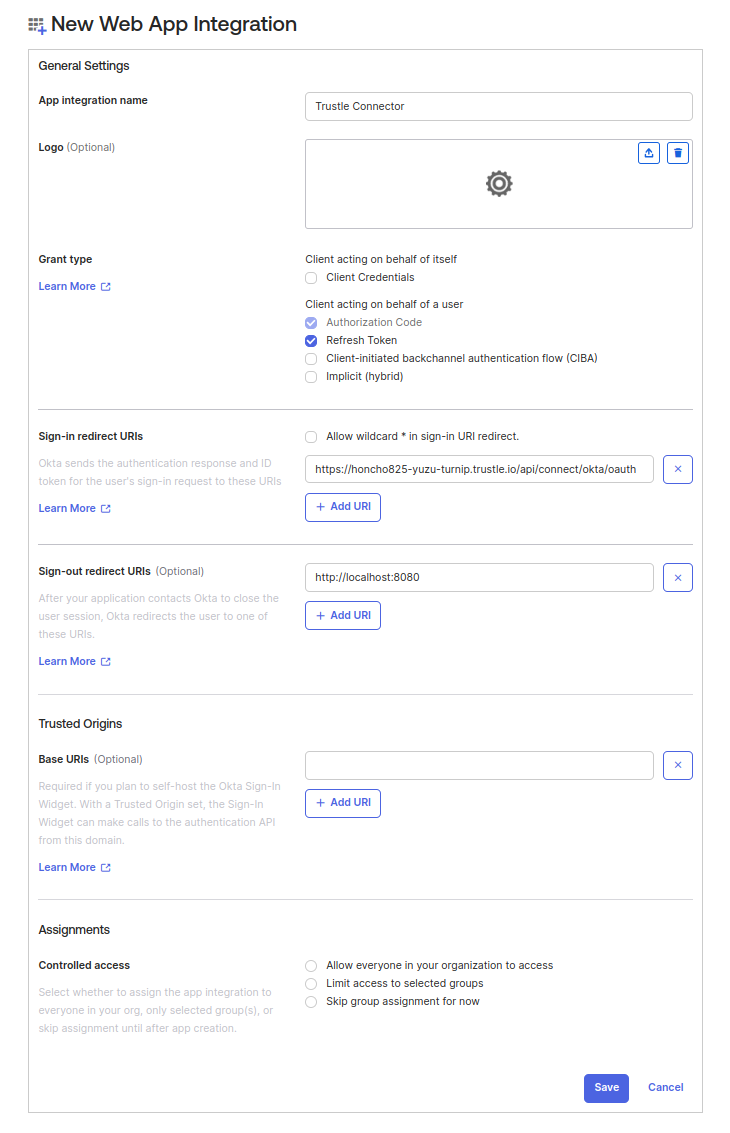
- For App Integration Name, enter Trustle Connector
- For Grant Type, select Authorization Code and Refresh Token
- For Sign-in redirect URIs, paste the value you find from the Okta install page.

- For Assignments -> Controlled access, select Skip Group Assignment for Now.
- Your configuration should look similar to the image below:
- Click Save at the bottom. The General tab of the Trustle Connector app should now be displayed.
- Click Okta API Scopes
- Click Grant for the following: okta.apps.manage, okta.apps.read, okta.groups.manage, okta.groups.read, okta.logs.read, okta.roles.manage, okta.roles.read, okta.users.manage, okta.users.read, okta.users.read.self
- Click the Assignments tab.
- Click Assign -> People -> "The Okta Admin User you are currently logged in as" -> Save and Go Back -> Done
- Click the General Tab.
- Copy and save for later the hostname of the Okta Admin URL, but only the first two strings seperated by a dash, eg, dev-1234567 (do not include the -admin...)
- Under Client Secrets, click the copy icon and save this secret for later.
- Under Client Credentials - Client ID, click the copy icon and save this Client ID for later.
- Go back to the Trustle "Add a New Okta System" tab.
- For Organization ID, enter the dev-123... hostname you copied previously.
- For Client ID, paste the value you copied earlier.
- For Client Secret, paste the value you copied earlier.
- Click Authenticate
- NOTE: When the login screen appears, make sure you are logging in to Okta as the same user you had assigned the app to.
- Click Continue. Trustle will sync data from Okta via the integration. After a short time, the new Okta Integration appears.
Settings
Now that the Okta System is installed, head over to the Settings tab within the System, and change these settings:
- Default Provisioning to Manual, Interactive, or Automatic. This turns on the System.
- Visibility to Visible. This allows your Users to see the System.
- Check Initiate Deprovisioning When Access Expires.

You're done! We're excited to help you secure your Okta organization with Trustle.